CLICK HERE FOR BLOGGER TEMPLATES AND MYSPACE LAYOUTS »

Thursday, January 29, 2009

A commercial style


I saw this on a commercial last night. So we sat down and did it today. This is the first time she peeled an orange by herself! :(


Separate the hair into 3 sections. The one in the front will be the headband.


Put the 2 larger back sections into messy buns.


Part the front section with a diagonal part. Smooth each side of the part back behind the ear on that side. I used gel and a small comb. Secure the hair with a clip.


Curl the ends that are hanging behind the ears.
She has those darn hairs in the front that just won't stay up.

Wednesday, January 28, 2009

win a spring wardrobe


Here is a great contest for everyone.

over at shabby apple you could win a new wardrobe for you daughter. Just by entering a free photo contest. Click here to go to contest.

My daughter could use a new wardrobe because we only have a Wal mart where we live, so I can't get cute clothes very often. I love this dress. Julia would look so adorable in it.

Monday, January 26, 2009

Three messy buns


I did this one the other day and thought it turned out great! I started by making 2 small ponytails. Right up in the front.


Take the rest of the hair and divide into 3 sections.


Take the 2 front ponytails and divide them into 2 pieces each. Take the middle pieces and put them into the ponytails oppisite of them. The outside pieces just go into the middle ponytail.


put the 3 large sections into messy buns.


I decided to use 3 bows. I got these bows from Bows 4 my 4 girls. Do you see that little dog in the picture above? That is my baby, Theodore Bear. Teddy for short. He is a Pomeranian. He will soon be a first time daddy.


She decided to stay in her pajamas all day. It was a cold and boring day.

Friday, January 23, 2009

knotted ponytails


This is something easy, quick, and fun. I first put her hair in 2 pigtails. I made them a little high up on the head and toward the outside of the head.


I then put a knot in each ponytail. Going from the under side of the ponytail.
Remove Formatting from selection

I pulled the pontails tight and spread them to cover the elastic. I added bows. I got these bows from www.bows4my4girls.com.


She has a little rash on her cheeks from the cold. We still have about 2 1/2 feet of snow on the ground. It melted a lot. We did have around 6 feet!!!! In this next picture she looks like she doesn't have any front teeth (she does) LOL!

Sunday, January 18, 2009

Win bows

I was just browsing blogs and came upon these bow giveaways....

http://babyhairbows.blogspot.com/2009/01/bloggy-giveaway.htm

http://www.whimsicalwalney.com/wp/

http://caryhairbows.blogspot.com/2009/01/time-for-our-monthly-hairbow-giveaway.htm


http://angelasaccessories.blogspot.com/2009/01/our-valentines-giveaway.html

Cute headband style


Ok, I saw this one on Babes in Hairland and I loved it. I just had to try it. So, I thought I would share it with you. First I made a part right down the middle. Then another one horizontally. I made 4 ponytails in the front.


Next, I put the headband on over the horizontal part. Make sure to cover up the part with the headband, so the part is not visible.


I took small pieces of hair from behind the headband and connected the front ponytails to it. Make sure to connect it as close to the headband as possible. Only the middle two ponytails are seperated into two pieces.


I tied the Scarf of the headband underneath her hair. I let the back of her hair down and put it into a low ponytail.


Then wrap the scarf around the ponytail and tie a knot to make a bow.


Here is a front view.


Here is a side view. See what I mean, Isn't it so cute? I just loved it when I saw it.

Tuesday, January 13, 2009

Quick Braids


Well, this one is kind of self explanatory. I needed something fast so this is what I got.


First I took a square section of the top of her head and seperated it into 4 parts. I then braided each of the 4 parts and added a colorful clip to each one.


Next I seperated the rest of the hair into 2 sections.


I put those two sections in braids. Something quick but cute.


My daughter loves seeing herself on here. She is helping me post this.

Monday, January 12, 2009

get a free gift certificate for bows

I just love hair bows. I can't make them myself (not from lack of trying.) But there are some great websites that sell beautiful, unique bows. There is one that I just love. Bows 4 my 4 Girls! Well, anyway, if you go to the website and sign up for their mailing list then in a day or two you will have a 5 dollar gift certificate in your e mail. Then you just go to the website and order. Right now they have free shipping! So you can get something very cute for your little girl. FREE!!!! I love the ladybug bow! It is my favorite. Just go to http://bows4my4girls.com.

Sunday, January 11, 2009

Fairy Princess Crown


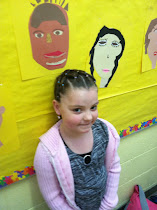
I haven't had anytime lately to post anything. All of a sudden my daughter and I have gotten really busy. So now that it is Sunday I finally had time for a post. Anyways, Julia decided to call this one her fairy princess crown. I know her face is dirty in this picture. She was eating chocolate while I was doing her hair. LOL.


First of all I started by hot gluing these cute little puffballs (which I got from Wal-Mart) to the tips of bobby pins. While those were drying I started on her hair.


First I put 4 ponytails along the front of her head. Easy enough!


Next, I used a pipe cleaner to pull the ponytails threw themselves to make knots in each one. I just ran the pipe cleaner under the elastic in the middle of each ponytail, wrapped the front of it around the ponytail itself and pulled it threw from the back.


Ok I hope I explain this part in a way everyone can understand. Here it goes....
I then made a second row of 5 ponytails. Seperating the ponytails in the first row into two peices each and connecting them to the adjacent ponytails in the second row. Pull the second row into knots just like the first row.


Seperate the back into 2 sections. Put into ponytails. Twist each ponytail into a bun, leaving a little on the ends out.


Curl the tops of the buns (the parts you left out). Spray with hair spray. Next take the dried bobby pins and insert into the middle two ponytails in the front row and the middle 3 ponytails in the second row. The balls themselves should be in a kind of cradle from where you knotted the hair. All finished!

Monday, January 5, 2009

railroad crossing


Here is one that I had alot of fun with. I first parted her hair right down the middle.


I took each side and put them in connecting ponytails. Right about to the middle of her head.


This is about where I stopped.


Then I took it and did the same thing but going up from the back of her head.


Repeat with the other side.


Now I took all 4 ponytails and tied them just as I would tie for the first part of tieing a shoe. I then clipped it with these pretty purple butterfly clips. You could curl the ends. I didn't because my daughter's hair is already curly.


Isn't my baby girl beautiful?

Friday, January 2, 2009

piggy twists buns

So for my first post I am doing something easy. Just so that I can figure this out.
Ok, so first you do a zig zag part down the middle of her head.


Next you separate the hair into 3 sections. Two on the top and one on the bottom.


Take one top section and twist it tight.

Now wrap it around itself and put a small rubber band around it.

Repeat with the other side. Let the bottom section down and you are done. I told you it was something easy. You can put a bow on each bun. I decided not to this time.